Showing posts with label fireplace. Show all posts

Tuesday, November 29, 2016

Are you sick of hearing about the fireplace yet?

After three months in our new home, we finally moved our beam to our driveway, where it then sat for a few weeks. But-- but!-- once our motivation set in, things moved quickly. Though our style mostly trends more streamlined, the laws of 1850s barn beams dictate that you appreciate them in (most of) their imperfect, dilapidated glory. So after a power wash and just enough sanding to remove flaking outer layers, we mixed a dark and a natural stain and gave the beam just two coats so that the details in the wood shine. 

Then we waited for a willing soul to stop by and lend some brute strength to the task of bringing this baby into the house. Nate's an engineer, so he ran equations and thought and re-thought the hanging process until he was satisfied that nothing could pull this mantel from the wall.


It was, however, too heavy for even these two strong men to lift from floor to the spot where it would be adhered to the wall, so we devised a levy system out of stools and step ladders. 


 Success at last!


And when you go to all this effort to customize your fireplace, you take an awkward family photo in front of it to commemorate all of the f-bombs and harried child redirection that went into the job.


Adding the remaining pieces to frame out the rest of the surround was comparatively nothing.


Our pretty marble tile arrived. I love that we got such varied marbling in our tiles. Though there's lots of white and gray, there's also a little tan and even purplish tones, and it takes on a sparkling appearance in the evening that is so so pretty. More on the pain-in-the-ass process of herringbone tile manipulation to come.


To be completely clear, these first two pieces of drywall are actually pieces #3 and 4, because it took Nate and I two mega fail moments where we almost had a piece of drywall placed and then it tumbled over backwards and epically smashed on the floor for us to figure out that we needed a different methodology.

See that extension pole on a broom to the left of the fireplace in the photo below? That along with some strategically pre-placed nails for balance was our saving grace, because Nate could take breaks to rest the drywall at intervals on his way up to the ceiling while I pressed the tops of the sheets against the frame with the flat broom to keep them steady while they got screwed in. 

We are so lucky that aside from a few ankle cuts from where the drywall bounced off Nate on its way down the second time, and a few spots of adhesive on our rug, we otherwise escaped unscathed. This is a "do not try this at home" lesson for all. There's a reason why people use professionals for projects such as this one.


After the drywall went up, so did the trim. We intentionally sized our fireplace to minimize drywall cuts, and then the trim ended up covering most of the seams. Score! We tiled before we drywalled the lower section so that we had a better idea of how we needed to trim it out. Again, more on that later.


And though we've managed to get her primed, the autumn and then winter holidays showed up, and I decided that I wanted to decorate my unfinished mantel more than I wanted to finish painting it. So there it remains until after the new year, where it may continue to haunt us for another few months before one of us sucks it up and gets it done.

Nevertheless, we've come a long way.


Friday, August 5, 2016

Fireplace construction, continued.

Our supervisor and the current dictator of all our house projects. He's a tough boss but at least he is cute and lets us sleep a little bit at night.


I'm not scared of heights, but the way this ladder balances on its rubber-covered feet slightly stressed me out. We ended up going with a telescoping ladder  that will let us use it as a normal step ladder in addition to getting up high when we need to access the roof or apparently, the windows in our great room. We also found it when it was on sale for less than $130, which was a huge bonus and the reason why we went with 22' instead of 16' or 18'.


You know that your husband is an engineer when he devises strings with washers to ensure that the fireplace surround will be exactly centered and exactly level. He also claims that our kids could climb this frame without damaging themselves or the wall, but we don't plan on testing that theory.


This picture makes me a little seasick, but it's what happens when your husband insists that a lower mantel makes more sense and you are too visual of a person to be able to respond without seeing what it would look like. Ultimately I won this battle and we went with the rule of thirds. The mantel will be at 6 feet (the right side) and exactly a third of the way up the wall.


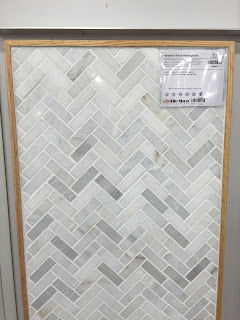
Now that we're actually making progress on framing the surround and finishing our mantel (more to come on that soon!), we needed to decide on a tile to use around the firebox and I headed to the store. Our initial plan was to utilize a subway-style marble tile but as it turns out, there were lots of viable options. 

(L- I love this pattern and the contrast of black and white that would complement our tuxedo kitchen. I was less sure of how the super graphic pattern would play with all of the other elements of our 18 foot tall fireplace surround. R- Herringbone is classic and I thought this oversized version was fun. But I questioned the beige undertones and monotony of color throughout.)


(L- I really think that this basketweave pattern would play well with the rectangles on the upper part of the wall, and the wood-look tile combined with marble is gorgeous. But I wondered if it might be too trendy in the end. R- Our original plan. I don't think subway tile can go wrong!)


(L- We love gray, perhaps a little too much, and the strong variation throughout this marble might give that contrast without going to an extreme like with the black & white tile above. R- Another herringbone option, this time with smaller tiles and both gray and beige undertones throughout. I was a little concerned that the small scale tile would look too tiny on our huge wall.)


Next step will be to lock our multi-hundred pound mantel into place this weekend after it's done curing. We ended up finishing it with a danish oil in a mix of medium and dark walnut to get close to the color of our dark hardwood floors.

Friday, July 8, 2016

Finally, a fireplace!

Okay. Almost a fireplace.

Most people come home from the hospital with a new baby and immediately fall into a kind of new baby twilight zone, where time no longer exists in the way that it previously did, sleep shifts roles from necessity to luxury, and the definition of a successful day includes hinges on everyone surviving it mostly intact. 

When we came home from the hospital with our daughter 5.5 years ago, my husband immediately ripped out our [floral bordered, old, linoleum] kitchen floor and began tiling. Our first son's arrival home coincided with a major basement flood, and so it was only natural that our newest addition inspired yet another home project. 

We intended to finalize a fireplace plan when the house was being built, but nothing felt right. We considered a traditional fireplace and immediately dismissed it, but a huge heavy stone wall didn't feel like the right thing either. It wasn't until June that inspiration finally hit, and we've gone from a big blank wall to a painter's tape outline of the bottom part to a fully designed plan that we're excited to put into action shortly.

The big blank wall as is, and also-- three cheers for no longer being pregnant! Baby Elias finally arrived early in the morning on June 20th after a thankfully quick and smooth labor.


A drawing in progress:


Getting closer:


And set! This is obviously a little oversimplified, but all of the proportions are right and so we're bringing our mantel home this weekend and will begin construction on the larger wall shortly. First order of business will be to see how sleek an 1800s barn beam can really get... I have my doubts!


We're also using this opportunity to finish our backsplash. While we originally had a very different idea in mind, we've decided to keep our low quartz backsplash for the time being and just tile behind our range up to the hood. We almost pulled the trigger on marble tiles, but as with every traditional finish we considered in this house, we ultimately have chosen a simpler but also very cool white glass tile that will set off but not compete with our pure white quartz counters.


Our sample:


Tile is on order and ready for installation:


Here we go! In the meantime, we're getting started on some outdoors projects. Those, unlike these fun interior plans, will go on forever. Good thing we have no plans to leave this place!